
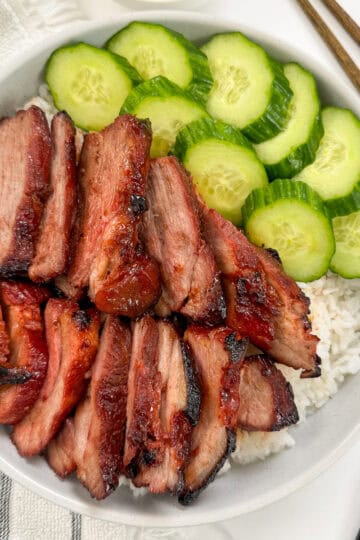
Air Fryer Crispy Pork Belly is a shortcut version of the popular Chinese Roast Pork (or Siu Yuk), which gives you the perfect combination of melt-in-your-mouth tender meat and ultra-crispy, golden skin.

With a simple seasoning mix and the magic of an air fryer, you can create this restaurant-quality classic Chinese dish right at home.
Pair it with a tangy dipping sauce (nuoc cham) or a spicy hoisin sauce for an unbeatable flavor experience.
What is Air Fryer Crispy Pork Belly?
Air fryer crispy pork belly (also known as Chinese Roast Pork or Siu Yuk) is a beloved dish in many Asian cuisines, known for its iconic crackling skin and juicy, savory meat.
Traditionally roasted, this version uses the air fryer to achieve the same crispy texture while keeping things easy and less greasy. It’s the perfect balance of rich flavor and irresistible crunch.

Why You’ll Love This Recipe
- Perfect crispy skin: The air fryer delivers beautifully bubbly and golden crackling every time.
- Easy to make: No deep frying or complicated steps—just season, air fry, and enjoy.
- Full of flavor: Chinese five-spice, garlic powder, and shaoxing wine create a savory, aromatic bite.
- Healthier option: Less oil means you can indulge without the guilt.
- Versatile and crowd-pleasing: Serve it as an appetizer, a main dish with rice, or alongside your favorite dipping sauces.
If you like this air fryer recipe, check out my Vietnamese Lemongrass Chicken (Cooked in the Air Fryer) and Sesame Shrimp Toast.
Ingredients
For the Pork Belly:
- Pork Belly: A rich and flavorful cut of meat with layers of fat that become tender and crispy when cooked.
- Salt: Seasons the pork and helps draw moisture from the skin for that perfect crunch.
- White Pepper: Adds subtle heat and earthy flavor to balance the richness of the pork.
- Chinese Five-Spice Powder: A warming blend of star anise, cloves, cinnamon, Sichuan pepper, and fennel for depth of flavor.
- Garlic Powder: Provides a savory kick to the spice mix.
- Shaoxing Wine: Adds a slightly sweet, aromatic flavor to enhance the pork.
- White Vinegar: Helps dry out the pork skin, creating that signature crispy texture.
- Oil: Brushed on the skin to encourage even browning and crispiness.
- Kosher Salt: Forms a salt crust on the pork belly to draw out excess moisture for bubbly crackling.
Vietnamese Dipping Sauce (Nuoc Cham):
- Fish Sauce: The salty, umami base for the Vietnamese dipping sauce (nuoc cham).
- Water: Balances the flavors in the dipping sauce.
- Sugar: Adds a touch of sweetness to complement the salty and tangy elements.
- Lime Juice: Brightens the dipping sauce with a pop of acidity.
- Rice Wine Vinegar: Enhances the tanginess of the nuoc cham.
- Thai Chili: Adds a kick of heat to the dipping sauce.
- Garlic: Infuses the nuoc cham with a fragrant, savory note.
Spicy Hoisin Sauce:
- Hoisin Sauce: A sweet and savory base for the spicy hoisin sauce.
- Sriracha Sauce: Adds bold heat to balance the sweetness of the hoisin.
How to Make Air Fryer Crispy Pork Belly
Prepare the Pork Belly
Rinse the pork belly and pat it dry with paper towels.
Make shallow diagonal cuts on the skin, then rotate and repeat to form a crisscross pattern. Do the same on the meat side, being careful not to cut all the way through.
Season the Pork
Mix salt, white pepper, Chinese five-spice powder, and garlic powder. Brush shaoxing wine over the meat side of the pork, then rub the spice mix into the meat.
Lightly brush the pork skin with white vinegar.
Air Fry the Pork Belly
Preheat the air fryer to 225°F for 5 minutes.
Place the pork belly on two layers of aluminum foil, folding the edges tightly to create a “boat” around the meat. Evenly layer kosher salt on the skin side.
Cook at 225°F for 35 minutes. Check halfway through and drain any excess fat.
Crisp the Skin
Remove the salt crust from the skin and brush it lightly with oil.
Increase the air fryer temperature to 400°F and cook for another 30–35 minutes, until the skin is golden, bubbly, and crispy.
Let It Rest and Serve
Allow the pork belly to rest for 5–10 minutes, then slice it into bite-sized pieces.
Serve with Vietnamese dipping sauce (nuoc cham) or spicy hoisin sauce.

Storage
Store leftover crispy pork belly in an airtight container in the fridge for up to 3 days. Reheat in the air fryer for a few minutes to restore its crispiness.
Tips
- Dry the pork skin thoroughly: The drier the skin, the crispier it will get—pat it down well before cooking.
- Don’t skip the salt crust: It’s essential for drawing moisture out of the skin, which leads to the perfect bubbly crackling.
- Rest before slicing: Letting the pork belly rest helps the juices redistribute and ensures tender meat.

Air Fryer Crispy Pork Belly
Equipment
Ingredients
Main Ingredients
- 2 lb pork belly
- 1 teaspoon salt
- ½ teaspoon white pepper
- 1 teaspoon Chinese five-spice powder
- ½ teaspoon garlic powder
- 1 tablespoon shaoxing wine
- 1 tablespoon white vinegar
- 1 tablespoon oil
- ⅓ cup kosher salt
Vietnamese Dipping Sauce (Nuoc Cham)
- ¼ cup fish sauce
- ⅓ cup water
- 3 tablespoon granulated sugar
- 2 tablespoon lime juice
- 2 teaspoon rice wine vinegar
- 1 small Thai chili
- 1 clove garlic
Spicy Hoisin Sauce
- 3 tablespoon hoisin sauce
- 2-3 teaspoon sriracha sauce
Instructions
- Rinse the pork belly and pat it dry with paper towels. Make shallow diagonal cuts on the skin side then rotate the meat at a slight angle and make shallow diagonal cuts again (to look like criss cross). Repeat the same cuts on the meat side. Be careful not to pierce through the meat.
- Mix salt, white pepper, Chinese five-spice powder, garlic powder. Add shaoxing wine on the meat side of the pork belly then rub the spice mix all over. On the skin side, lightly brush with vinegar.
- Preheat your air fryer to 225F for 5 minutes. Place pork belly on two layers of aluminum foil then fold edges to wrap pork belly tightly on all corners, like a tight boat. Add salt on top of the pork belly skin side up evenly to create a layer of salt. Place the pork belly skin-side up in the air fryer basket. Cook at 225°F for 35 minutes. Check halfway through and drain any excess fat if needed.
- Scrap salt off from the pork belly skin then brush with some neutral oil. Increase the temperature to 400°F and cook for an additional 30-35 minutes until the skin is golden, bubbly, and crispy.If you don't have an air fryer, see notes below for cooking this in the oven.
- Remove the pork belly from the air fryer and let it rest for 5-10 minutes. Slice into bite-sized pieces and serve with your favorite dipping sauces or rice.


David says
There are many good instructions that I didn't know. Thank you very much. DT.
Herman says
Thank you so much for the kind feedback!
kristian says
I was skeptical that it thought it wasn't going to be as crispy using the air fryer, it turned out I was wrong, they are super crispy and delicious. Great recipe!
Herman says
Yes, pork belly crisps up perfectly in the air fryer. Glad you liked it!
Herman says
Thanks so much! Glad you liked it